5 minutes
Intel VCA Cards but more technical
Introduction
Last time we got a k3s 3 node cluster working across two VCA cards.

If you haven’t read Part 1, then I’d suggest to go do that now, else, welcome.
This time I’m going to go into a bit more detail as to initial host setup, as well as attempting some persistent images/intel-vca.
As a reminder, everything I’m doing is for the Intel VCA, not the Intel VCA2.
Host Setup
I chose to use CentOS for my host setup. The Intel downloads page here has a great listing of what files exist for what versions of the software, while here just lists them all out.
There’s only a few things to be aware of.
- You really only have the choice of Ubuntu 16 and CentOS7. I chose CentOS, as I took a guess and thought I could at least run 7.9, which, while not modern, was also not all that ancient.
- You need to use the special kernel that Intel ships with the CentOS installation files.
Most of the host setup is quite well covered otherwise in the Intel documentation.
Guest Setup
Initially as a first proof of life, I was getting the volatile non persistent images/intel-vca to boot off of the same SSD the OS was running on. Additionally, I was having every card boot off the same volatile img file.
This seemed to be a cause of the dreaded “dma_hang”, which I promise we’ll go over later.
The volatile images/intel-vca are extremely easy to get booted. Download the relevant OS from Intel, and run vcactl boot <card-id> <cpu-id> <image-path>. The card will go through a series of status messages, booting, dhcp_in_progress, and if you did everything right, it will stop at net_device_ready.

At this point, you can grab the nodes ip, and ssh in like it’s a VM.

Once you hit your shell, you’re golden.

“dma_hang”
I don’t know why this happens. I’ve tested the ram through and through, and it’s passed every memtest I’ve thrown at it with flying colors. But every so often, one or more of the systems on the cards will report with:

On VCA2, you can “press the power button”, using vcactl pwrbtn-long <card-id> <cpu-id>, but that’s not a thing on VCA1.
So far in my experience, when vcactl status reports “dma_hang”, the entire host system must be rebooted for that node to be usable in any fashion. Maybe it’s something related to the disk, maybe it’s guest or host RAM related, I really don’t know.
When you Google Intel VCA "dma_hang", this blog is the only result:

Maybe some day I’ll figure this out, or maybe one of you kind readers will figure it out for me, and give me some clear answer. Until then, many of the screenshots of this blog in regards to VCA will likely have at least one node in dma_hang
For Reference, the actual errors look something like:

Today, my answer is to reboot the host system, and try again, and hope you get lucky. Once the systems boot proper without a dma_hang, it seems like they just continue healthy no problem.
Persistence
Persistence is obviously important when it comes to a PCIe card with 3 systems. You obviously don’t want to rely on RAMDISK for everything.
The Intel Reference Persistent images/intel-vca are available on their support/downloads page. Start with that, and unzip/gzip yourself down to a .vcad file. I chose to do Ubuntu, so my final vcad file is named vca_disk_24gb_reference_k4.14.20_ubuntu16.04_2.3.26.vcad.
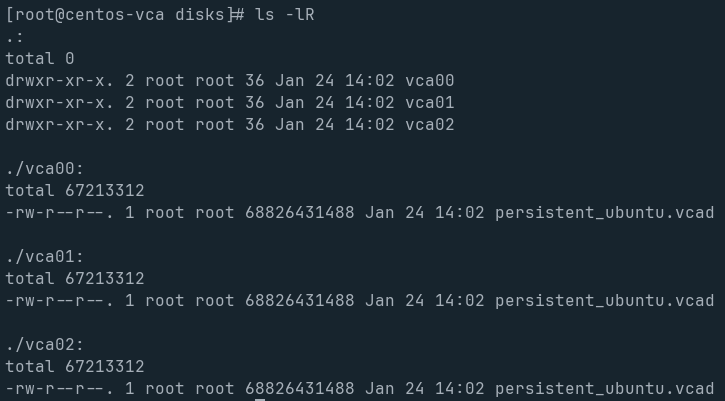
As I said in the first post, my main OS is on a consumer grade cheap SSD, so I have a 2nd disk, sda, that’s a proper “EnTeRpRiSe” grade disk. That’s mounted to /disks. Each VCA node needs it’s own copy of this vcad file.

Each VCA CPU gets it’s own BlockIO device (vcablk0 always, as it’s the boot device), established with that relevant VCAD file.
Once the VCAD files are in place, run vcactl blockio open <card-id> <cpu-id> vcablk0 RW <vcad file location>. In my case, the command was vcactl blockio open 0 1 vcablk0 RW /disks/vca01/persistent_ubuntu.vcad.
Do that for all cards and cpus, and your vcactl blockio list should appear something like this:

Personally, I just set my configs to always boot off vcablk0 by running vcactl config os-image vcablk0. This will default to booting each CPU off it’s own respective vcablk0 device.
Once all the BlockIO devices are mounted, simply run vcactl boot, and it will boot all cards and all cpus to their relevant block devices. This is most often when the dreaded dma_hang will occur. I got lucky on my most recent instantiation, and have all 3 CPUs on Card 0 successfully booted to their respective persistent volume.

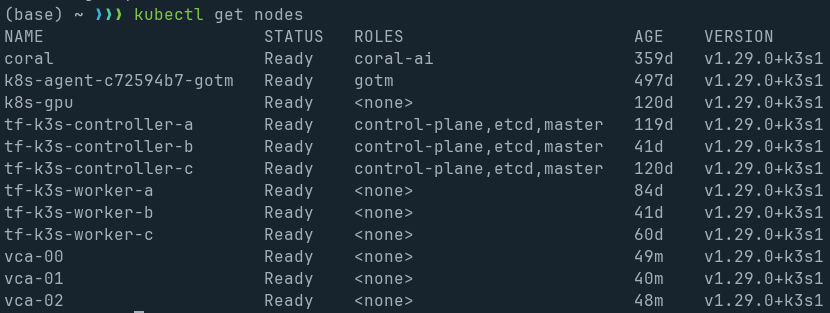
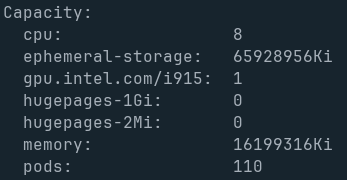
Through some k3s configs that I won’t go into here, I now have all 3 of the CPUs on this specific VCA card joined to my Kubernetes cluster, and healthy. Importantly, the Intel GPU plugin and Node Feature Discovery picked up the fact that an Intel GPU is present, and made it available as an i915 resource.


Conclusion
At this point, I’m going to just let these run for a bit, and see how well they last just “being online”. I might try running a game server on one, or try running a virtual desktop to see how that might work.
One of the fun ideas I had was to run something like “9 gamers one 1u system”, where each person got their own VCA cpu to play games on, and see how that went. Maybe use Sunshine/Moonlight or something.
Anyway, might do a part 3 if I can get that working, but after the last few days my head is tired of dealing with VCA.
PS:
This page is running off the VCA cards as of publishing!
